Category Archives: devops

Salt-Api with Saltstack in 2018

This article is related to SaltStack. SaltStack, also known as Salt, is a configuration management and orchestration tool. It uses a central repository to provision new servers and other IT infrastructure, to make changes to existing ones, and to install software in IT environments, including physical and virtual servers, as well as the cloud.
This is specific to salt-api which is part of open salt. Many of the articles on the internet are for salt-api are from time 2014 – 2016 period where  salt-api was different project from salt-master, and then they merge into the salt core
This is walk through of using salt-api on Ubuntu 16/17/18

Step 1

Install salt-api package, this would install all dependencies which are needed by salt-master to host salt api http server
sudo apt-get install salt-api

Step 2

Configure external auth
salt-api is flexible and can integrate pam, ldap and other authentication
external_auth:
  pam:
     saltuser:
        – ‘.*’
        – ‘@wheel’   # to allow access to all wheel modules
        – ‘@runner’  # to allow access to all runner modules
        – ‘@jobs’    # to allow access to the jobs runner and/or wheel module
What this config tells is
External auth is ‘pam’
saltuser is the linux system user, which has following permission
.* – everything
‘@wheel’ – allow wheel modules permission
‘@runner’ – allow runners modules permission
‘@jobs’ – allow jobs modules permission

Step 3

Configure cherrypy, which has port 8000, ssl_crt, ssl_key, certificates. I have create self signed certificates with openssl for this.
rest_cherrypy:
  port: 8000
  ssl_crt: /etc/salt/tls/certs/localhost.crt
  ssl_key: /etc/salt/tls/certs/localhost.key
  disable_ssl: True
This changes were done in separate file
/etc/salt/master.d/salt-api.conf
complete file look something like this
external_auth:
  pam:
     saltuser:
        – ‘.*’
        – ‘@wheel’   # to allow access to all wheel modules
        – ‘@runner’  # to allow access to all runner modules
        – ‘@jobs’    # to allow access to the jobs runner and/or wheel module
 
 
rest_cherrypy:
  port: 8000
  ssl_crt: /etc/salt/tls/certs/localhost.crt
  ssl_key: /etc/salt/tls/certs/localhost.key
  disable_ssl: True

Step 4

Restart the salt-master service
# systemctl restart salt-master

Step 5

Test with curl
curl -si localhost:8000/login \
-c ~/cookies.txt \
-H “Accept: application/json” \
-H “Content-type: application/json” \
-d ‘{
    “username”: “saltuser”,
    “password”: “saltuser”,
    “eauth”: “pam”
}’
Output would be similar
> -c ~/cookies.txt \
> -H “Accept: application/json” \
> -H “Content-type: application/json” \
> -d ‘{
>     “username”: “saltuser”,
>     “password”: “saltuser”,
>     “eauth”: “pam”
> }’
HTTP/1.1 200 OK
Content-Length: 206
Access-Control-Expose-Headers: GET, POST
Vary: Accept-Encoding
Server: CherryPy/3.5.0
Allow: GET, HEAD, POST
Access-Control-Allow-Credentials: true
Date: Mon, 09 Jul 2018 10:03:26 GMT
Access-Control-Allow-Origin: *
X-Auth-Token: 464914c055cfa5529865564567eb7782554af025
Content-Type: application/json
Set-Cookie: session_id=464914c055cfa5529865564567eb7782554af025; expires=Mon, 09 Jul 2018 20:03:26 GMT; Path=/
{“return”: [{“perms”: [“.*”, “@wheel”, “@runner”, “@jobs”], “start”: 1531130606.41419, “token”: “464914c055cfa5529865564567eb7782554af025”, “expire”: 1531173806.414191, “user”: “saltuser”, “eauth”: “pam”}]}

Step 6

Test with curl function test.ping
curl -b ~/cookies.txt -si localhost:8000/ \
    -H “Accept: application/json” \
    -d client=’local’ -d tgt=’*’ -d fun=’test.ping’
If you get output, you are all great with salt-api for 2018.3 version of salt.

Publish dotnet core app using MSDeploy

Recently, I got a task to setup CI-CD pipeline for the dotnet core project. CI was easy, CD had challenges.

In CD, I need to deploy on Windows as well as Linux. In this post, I going to describe for the windows. Microsoft did good job in documenting the asp.net core and IIS integration. https://docs.microsoft.com/en-us/aspnet/core/publishing/iis

What it say is, first install IIS, install the .NET Core Windows Server Hosting bundle on the hosting system and then create asp.net core website. This all as part of one time installation on the target machine.

Next part would be deploying new versions of the same ASP.NET core web application again and again. Now, this part needs to be automated as continues deployment (CD) pipeline.

Challenges are

  1. You build the code on one machine and deploy on other
  2. In my case, due to IT policy, I wasn’t allow to create network share folders for deployment
  3. It needs to be secure, as only users who had permissions can only deploy

Now, how do I copy website code from one machine to other machine IIS without network share folder? As I was looking around for a solution, I found Microsoft has already solve this problem way back in 2010 with Web Deploy.

Microsoft was always has confusing name conversion, they market as Web Deploy, but internally called it as MS Deploy. This tool is unsung hero of deployment. When it comes to automated deployment, people talked of chef, puppet but MSDeploy isn’t acknowledged much.

Okay, what this tools does? You can publish website remotely without need to transfer file manually to that machine and setup the website way you want. That’s means, it can create the app pool, set the folder permissions, configure the port, configure the binding, etc. Not just transfer of code files.

Now, there are few good resources over the web, esp from the Vishal Joshi http://vishaljoshi.blogspot.in/search?q=msdeploy and SAYED IBRAHIM HASHIMI http://sedodream.com/SearchView.aspx?q=msdeploy whom has written extensively of on how to work with MS Deploy.

You need to install Web Deploy 3.6 remote agent service on the target machine. Can’t figure what this is, read through the following blog post to install MS Deploy http://chamindac.blogspot.in/2016/05/deploy-aspnet-core-10-to-remote-iis.html

Here, build server in black and target deployment server  in red color.

MSDeploy.png

On the build server, you need to run following command to publish the dotnet core website, dotnet publish -o {path to publish folder}

dotnet publish -o D:\publishcode

Here, I want to deploy website in “Default Website/WebApp” on the target server.
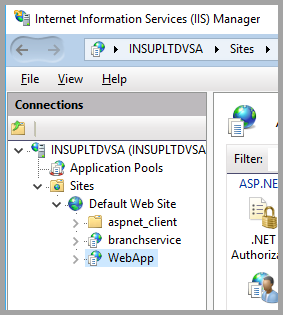
WebappInIIS.png

Use this command to deploy on the build machine. Here, username password would be local administrative user of the target machine.

servernameorip can be computer name like “WL-TPM-348” or could be IP on machine like “10.20.30.15”

By default, MS Deploy is installed in C:\Program Files (x86)\IIS\Microsoft Web Deploy V3 folder. If it’s install elsewhere, but that path for msdeploy.exe.

D:>"C:\Program Files (x86)\IIS\Microsoft Web Deploy V3\msdeploy.exe" -verb:sync -source:iisApp="D:\publishcode" -dest:iisApp="Default Web Site/WebApp",ComputerName="servernameorip",UserName='ServerUser',Password='password',AuthType='NTLM' -allowUntrusted

Mind, this is bare metal command to deploy code. It doesn’t have SiteManifest.xml which configures IIS Web application for app pool, ports, binding, etc. Neither it’s paramterize. But, it good example to get started.

Hope, you find this post useful